Wednesday, December 21, 2011

Fixing TeraStation Pro's Samba to Work with Lion

One of the biggest annoyances of upgrading my home iMac to Lion was the fact the smb and afp mounts to my TeraStation Pro stopped working. It appears that in Lion the smb and afp protocols are now using DHCAST128 authentication. This breaks the authentication mechanism on the TeraStation. Since my TeraStation is pretty old I had little hope that Buffalo would fix the issue. So it was up to me to get it fixed.

Luckily I already rooted my TeraStation and had the OpenTera packages installed. There are a few different options for rooting your TeraStation. I tried some of these methods but I was on firmware version 2.14. I found that the "/www/cgi-bin/ts.cgi" method to be effective but still slow and tedious. Luckily there is a utility named acp_commander. It is available here with instructions here and Readme here. Be warned that if you do not know what you are doing you could really mess up your TeraStation. Depending on your firmware version Your Milage May Vary.

Using acp_commander I was able to enable ssh access to my TeraStation. I edited the /etc/sshd/sshd-config files and the init scripts to start ssh on boot. Once that was done it is very easy to add packages to your TeraStation. The packages come with an install script. all you need to do is copy the package link down to a temp folder using wget (you may need to install the package first)

wget package_name


Unzip the package (you may need to install this as well)


unzip package_name.zip


Then make the install script executable


chmod 755 install_script.sh


After that you can run the install script to install the package.


sh install_script.sh


or


./install_script.sh


Looking at the OpenTera packages I noticed that there was a Samba 3 package available. This was exactly what I needed to fix the TeraStation issue I was having because Samba 3 has implemented DHCAST128 authentication. I used wget to pull the samba3 package down. Unzipped it. Then ran the install script. I used the Samba 3 without AD integration since I don't use AD on my home network.


Once the install script was done I restarted my TeraStation for good measure and was able to connect to my smb shares again! I did not need to mess around with the config files. You also might want to consider enabling nfs on the TeraStation but that tutorial will have to wait for another time.


As always if you have any questions let me know in the comments.

Tuesday, June 7, 2011

Moving to Disqus for Comments

The Blogger commenting systems sucks. So I will be using Disqus for all future comments. Hopefully it will work better than what is currently in place. I'll just have to wait and see. 

--ian

Friday, May 13, 2011

Back Track 5 on VirtualBox

One of the best ways to keep my mind off my health is to dig into tech and write about it. I can't begin to say how excited I am about the release of BackTrack 5. It has really come a long way and from the days of WHAX and Auditor. I would first like to thank the developers for all of their hard work.

As much as I would love to run it as my primary operating system I have a work supplied laptop and I am required to run Windows 7. Still that does  not mean I can't run it in a VM. That's where VirtualBox comes in. This tutorial is VirtualBox and BackTrack 5 specific it is done on Windows 7. Your mileage may vary on OS X and Linux.

Requirements:
Working VirtualBox installation: http://www.virtualbox.org/
BackTrack 5 iso: http://www.backtrack-linux.org/downloads/  <-Download the Torrent and Please keep seeding!

I'm using the 32bit KDE version.

Installing BackTrack 5
Start up VirtualBox and Click on the New Button in the upper left hand side of the Window. Or just press Ctrl-N
.  
Be a good user and read the blurb then Click Next
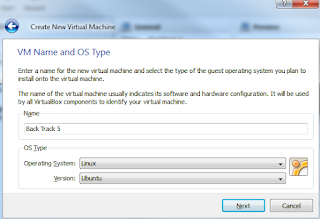
Give the new VM a good name Maybe BackTrack 5. For the Operating System drop down box select: Linux. For the Version drop down box select: Ubuntu. Then click Next.
Select the amount of RAM you want allocated to the VM and click Next.
You will want to create a new Hard Disk. I am going with the default 8GB. Make sure you have Book Hard Disk checked and click Next.
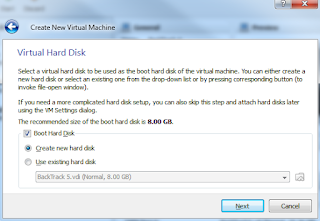
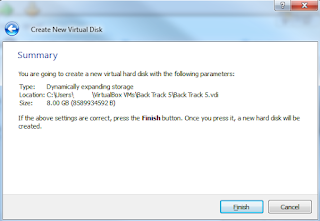
Read about the Hard Disk Wizard and click Next. Now select if you want a dynamic or static sized hard disk. I went with a Dynamic 8GB disk (for the tutorial) but if you intend on using the VM a lot I would consider making it at least 15GB. If you also intend to make a lot of use of the VM I would also partition the disk into at least a /boot, /home and / partitions. I might come back and go over that but I don’t have the time right now. Select your hard disk size then click Next. Now read the Summary and make sure all the info is right. If it is click on Finish. Once you do this VirtualBox will create the hard disk, If you chose a large static drive it could take a while.
The Wizard will now kick you back into the main VirtualBox window. You should also see your new VM in the list on the left hand side of the window.
in_VB
Now we need to get the VM set up to boot the BacktTrack iso.
  1. Right Click on the VM or click on it and press CTRL-S.
  2. When the Settings window comes up click on Storage. The one issue I have with VirtualBox after working with VMWare is that mounting an External CD or DVD is not that intuitive.
  3. First under IDE Controller click on the picture of the CD that says Empty.
  4. Now in the upper right hand corner click on the CD icon and select: Choose a Virtual CD/DVD Disk File. This will bring up an explorer window. Now find the BackTrack 5 iso you downloaded earlier click on it and then click Open.
  5. When the window closes click on OK at the bottom of the Settings window.
settings
Luckily the default boot settings for VirtualBox will boot the CD before the hard disk. So we won’t need to screw around with the boot order.
We are now ready to boot the VM. Click on the Back Track 5 VM and the click the Start button at  the top of the window.
A new Window will open and you will come to the BackTrack 5 boot screen. We will go with the default and select: BackTrack Text – Default Boot Text Mode
First Boot
You will now be brought to the command line. To get to the GUI/xserver you will need to type startx and then press Enter.
startx
In the upper left hand side of the window now click on Install BackTrack. This will open up the BackTrack hard disk installation dialog box.
  1. Select your language and click Forward
  2. Select your Location/Time Zone and click Forward
  3. Select your keyboard preference US, Dvorak etc and click Forward
  4. Now you can specify partitions is you want or you can be lazy like me and just install to the whole disk by selecting: Erase and use the entire disk.  Then click Forward.
disk_space
The VM will now be ready to install. Go over the summary and make sure everything is in order. Then click on the Install button. The install takes a while so go and get a well deserved beverage, preferably one with a lot of caffeine.
waiting
When the install is done you should shut down the Virtual Machine by clicking Restart Now and then clicking the close button in the upper right hand side of the window. and select: Power off the machine.
Now remove the iso from the CD/DVD drive by going into the settings for the VM, Selecting storage. Clicking on the BackTrack-5 iso then under Attributes select Host Drive ‘D:’ <- In my case it was D: it may be different depending on your setup. Then click OK. Or select Remove virtual disk from drive.
Now Click on the VM again and click the Start button.
At the login screen type in: root for the username and toor for the password. These are the default passwords for all BackTrack releases. So since just about everybody and their mother knows them it would be prudent for the first thing you do is to change the root password. Do this by typing:
   1: passwd
Now enter your new password make sure to keep it in a safe place if you decide to write it down. I suggest against writing it down and store it in KeePass.
You should also install any updates by using apt-get or aptitude. I’m a little old school and have apt-get ingrained in my head so that is what you will be getting.

   1:apt-get update
now
   1:apt-get –y upgrade

Installing VirtualBox Guest Additions

The VirtualBox Guest Additions are a set of kernel extensions and configuration changes that will make the BackTrack install a bit more user and GUI friendly. It allows for screen resizing as well as the ability to automatically move the cursor from the VM to the Host OS without having to press the release cursor short cut.
Before we can install the Guest Additions we will need to get the kernel sources installed and configured on the VM. Do this by running:
   1:prepare-kernel-sources
   2:cd /usr/src/linux
   3:cp -rf include/generated/* include/linux/
FYI - The above was taken verbatim from the Backtrack-Linux wiki. I want to make sure to give credit where credit is due. They have a great wiki over there and I highly suggest looking at their tutorials.
You will need the following environment variable as well KERN_DIR. To get it in place type:
   1: KERN_DIR=/usr/src/linux
   2: export KERN_DIR
 
Now that the prerequisites are met we can install the Guest Additions. Let’s do it from the GUI. Start the xserver with
   1: startx
In the upper left hand of the VM window click on Devices –> Install Guest Additions. This will mount a virtual CD drive that contains the Guest Additions script. Mine was mounted under:
/media/VBOXADDITIONS_4.0.4_69151/
An easy way to do this is to click on the USB symbol in the lower right hand side of the BackTrack VM and click on VBOXADDITIONS_4.0.0.xxxxx under Optical Disc. This will open it up in Dolphin. Now you can click on the VBoxLinuxAdditions.run shell script.
additions
This will compile and install the Guest Additions. When the script is done press Return/Enter to close the shell. Now restart your VM.
That should be it, You should now be all set up to run BackTrack 5 inside VirtualBox.
If you have any issues or find any error with the tutorial let me know and I'll do what I can to fix it ASAP. Enjoy!

Thursday, April 14, 2011

Photobooth + The Kids


They are as crazy as ever. Little man loves to run around with his shirt off and his sisters are as sweet as ever.

Thursday, April 7, 2011

Weather Geek

I am somewhat of a weather geek. It all stems from growing up on a farm. Weather is extremely important in the flower business. Too much rain can cause the flowers to rot on the stem. At the same time too much hot weather can cause the blooms to wither before you get a chance to pick them. I fondly remember waking up early with my father to watch the satellite radar weather station to see what the day and days to come will be like.

I have been a huge user of both The Weather Underground and Intellicast. However, I have found a new site that is amazing WeatherSpark. All I can say is wow. It may not have all the bells and whistles of the other sites, but it has an amazing interface. It is not a replacement for the aforementioned sites. Wunderground has an amazing group of local stations and a community of users of which I want to join. However, my neighbor 100' away already has a station set up so there is really no  need to. Intellicast still has an amazing animated radar page. I really like the interface of WeatherSpark. Hopefully they will keep developing it. A few more features and it could become the only Weather site I use.

On a parting note does anyone else have any Weather websites they would like to recommend to me?

Tuesday, February 15, 2011

Setting up Kippo on an AWS Linux Micro Instance

I came across a medium interaction honeypot named Kippo recently. It is written in Python and relies on the Twisted framework for most of its networking. I signed up for the free AWS micro instance (http://aws.amazon.com/free/)and was thinking of moving my blog over to it. However, the last thing I wan to do when I get home is administer my own server. So I decided I might take advantage of the micro instance by running a honeypot on it. I have done honeypot research in the past for my Masters degree and have always liked studying the bots and skiddies that break in.

The micro instance is running a stock 10GB AWS Linux image. I am running ami-08728661 like other micro instances it is a boot from EBS ami. AWS Linux is built on Red Hat sources so it is really a lot like running a CentOs server (without the huge repo). AWS Linux has a smaller repo and the instance itself is really stripped down. I think this is great from a security perspective. However, when it came to installing Kippo there were a few packages that were missing. Most notably Twisted.

Download the latest version of Twisted at:


In order to install Twisted there are a few python module dependencies that need to be met. The easiest way to install these modules is to use python-setuptools easy_install. So from a command prompt run:


Another package that is needed is python-devel so run:

Now install the needed python modules pycrypto and pyasn1

and

Now you can install Twisted first un bzip and un tar the bundle:


Enter into the Twisted directory:


Now run the python setup script:

Once Twisted is installed it is time to get Kippo and get it running. You can download Kippo from:


I used wget to pull it down:

Ungzip the package:

Now you can move the Kippo driectory to wherever you want I chose to move it to the /opt directory:


By default Kippo runs on port 2222 so in order to have ssh access to your server I suggest moving the ssh port to another higher port. You can make this change in your /etc/ssh/sshd_conf file. Once you change the port you connect to restart the ssh server with:

or
Reconnect to your micro instance on the new ssh port.

Now you can use IPTables to redirect all traffic to port 22 to port 2222 by using the following IPTables command:

Now everything should be in place. Make sure you do not run Kippo as root. Now you can run the start.sh script in the kippo-0.5 directory.

If everything works correctly you should now see kippo running. Now try to connect to your new honeypot and verify it works.

Take a look at the kippo.cfg file to get a good idea about all of the configuration options. You can also add more commands. However, that will have to wait for another blog post. Have fun and be safe. If you et any interesting results please don't hesitate to share them with me.