One of the best ways to keep my mind off my health is to dig into tech and write about it. I can't begin to say how excited I am about the release of BackTrack 5. It has really come a long way and from the days of WHAX and Auditor. I would first like to thank the developers for all of their hard work.
As much as I would love to run it as my primary operating system I have a work supplied laptop and I am required to run Windows 7. Still that does not mean I can't run it in a VM. That's where VirtualBox comes in. This tutorial is VirtualBox and BackTrack 5 specific it is done on Windows 7. Your mileage may vary on OS X and Linux.
Requirements:
Working VirtualBox installation:
http://www.virtualbox.org/
BackTrack 5 iso:
http://www.backtrack-linux.org/downloads/ <-Download the Torrent and Please keep seeding!
I'm using the 32bit KDE version.
Installing BackTrack 5
Start up VirtualBox and Click on the New Button in the upper left hand side of the Window. Or just press Ctrl-N

.
Be a good user and read the blurb then Click Next
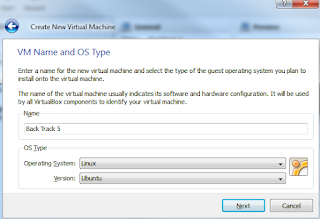
Give the new VM a good name Maybe BackTrack 5. For the Operating System drop down box select:
Linux. For the Version drop down box select:
Ubuntu. Then click Next.
Select the amount of RAM you want allocated to the VM and click Next.
You will want to create a new Hard Disk. I am going with the default 8GB. Make sure you have Book Hard Disk checked and click Next.
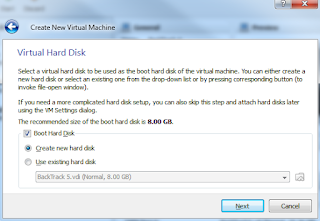
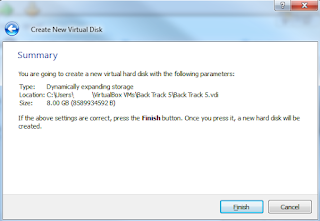
Read about the Hard Disk Wizard and click Next. Now select if you want a dynamic or static sized hard disk. I went with a Dynamic 8GB disk (for the tutorial) but if you intend on using the VM a lot I would consider making it at least 15GB. If you also intend to make a lot of use of the VM I would also partition the disk into at least a /boot, /home and / partitions. I might come back and go over that but I don’t have the time right now. Select your hard disk size then click Next. Now read the Summary and make sure all the info is right. If it is click on Finish. Once you do this VirtualBox will create the hard disk, If you chose a large static drive it could take a while.
The Wizard will now kick you back into the main VirtualBox window. You should also see your new VM in the list on the left hand side of the window.

Now we need to get the VM set up to boot the BacktTrack iso.
- Right Click on the VM or click on it and press CTRL-S.
- When the Settings window comes up click on Storage. The one issue I have with VirtualBox after working with VMWare is that mounting an External CD or DVD is not that intuitive.
- First under IDE Controller click on the picture of the CD that says Empty.
- Now in the upper right hand corner click on the CD icon and select: Choose a Virtual CD/DVD Disk File. This will bring up an explorer window. Now find the BackTrack 5 iso you downloaded earlier click on it and then click Open.
- When the window closes click on OK at the bottom of the Settings window.

Luckily the default boot settings for VirtualBox will boot the CD before the hard disk. So we won’t need to screw around with the boot order.
We are now ready to boot the VM. Click on the Back Track 5 VM and the click the Start button at the top of the window.
A new Window will open and you will come to the BackTrack 5 boot screen. We will go with the default and select: BackTrack Text – Default Boot Text Mode

You will now be brought to the command line. To get to the GUI/xserver you will need to type startx and then press Enter.

In the upper left hand side of the window now click on Install BackTrack. This will open up the BackTrack hard disk installation dialog box.
- Select your language and click Forward
- Select your Location/Time Zone and click Forward
- Select your keyboard preference US, Dvorak etc and click Forward
- Now you can specify partitions is you want or you can be lazy like me and just install to the whole disk by selecting: Erase and use the entire disk. Then click Forward.

The VM will now be ready to install. Go over the summary and make sure everything is in order. Then click on the Install button. The install takes a while so go and get a well deserved beverage, preferably one with
a lot of caffeine.

When the install is done you should shut down the Virtual Machine by clicking Restart Now and then clicking the close button in the upper right hand side of the window. and select: Power off the machine.
Now remove the iso from the CD/DVD drive by going into the settings for the VM, Selecting storage. Clicking on the BackTrack-5 iso then under Attributes select Host Drive ‘D:’ <- In my case it was D: it may be different depending on your setup. Then click OK. Or select Remove virtual disk from drive.
Now Click on the VM again and click the Start button.
At the login screen type in: root for the username and toor for the password. These are the default passwords for all BackTrack releases. So since just about everybody and their mother knows them it would be prudent for the first thing you do is to change the root password. Do this by typing:
Now enter your new password make sure to keep it in a safe place if you decide to write it down. I suggest against writing it down and store it in
KeePass.
You should also install any updates by using apt-get or aptitude. I’m a little old school and have apt-get ingrained in my head so that is what you will be getting.
now
Installing VirtualBox Guest Additions
The VirtualBox Guest Additions are a set of kernel extensions and configuration changes that will make the BackTrack install a bit more user and GUI friendly. It allows for screen resizing as well as the ability to automatically move the cursor from the VM to the Host OS without having to press the release cursor short cut.
Before we can install the Guest Additions we will need to get the kernel sources installed and configured on the VM. Do this by running:
1:prepare-kernel-sources
2:cd /usr/src/linux
3:cp -rf include/generated/* include/linux/
FYI - The above was taken verbatim from the Backtrack-Linux wiki. I want to make sure to give credit where credit is due. They have a great wiki over there and I highly suggest looking at their tutorials.
You will need the following environment variable as well KERN_DIR. To get it in place type:
1: KERN_DIR=/usr/src/linux
2: export KERN_DIR
Now that the prerequisites are met we can install the Guest Additions. Let’s do it from the GUI. Start the xserver with
In the upper left hand of the VM window click on Devices –> Install Guest Additions. This will mount a virtual CD drive that contains the Guest Additions script. Mine was mounted under:
/media/VBOXADDITIONS_4.0.4_69151/
An easy way to do this is to click on the USB symbol in the lower right hand side of the BackTrack VM and click on VBOXADDITIONS_4.0.0.xxxxx under Optical Disc. This will open it up in Dolphin. Now you can click on the VBoxLinuxAdditions.run shell script.

This will compile and install the Guest Additions. When the script is done press Return/Enter to close the shell. Now restart your VM.
That should be it, You should now be all set up to run BackTrack 5 inside VirtualBox.
If you have any issues or find any error with the tutorial let me know and I'll do what I can to fix it ASAP. Enjoy!


